Pre-deployment operations and calibrations
Contents
4. Pre-deployment operations and calibrations
4.1. Storage and cleaning
Optode foils typically drift more while in storage than while in use, the reasons for this are thought to be due to exposure to UV radiation and dry air (Bittig et al., 2018), (Data Instruments AS, 2018). We recommend that all optodes should be stored away from the light (especially fluorescent lights), keep the foil wet and use the rubber caps provided with the sensor. Sensors should be cleaned before storage and stored with black caps on, including some Milli-Q or tap water, or with a piece of wet cotton taped against the foil. If sensors are stored dry the foil will dry out which could lead to 1-2 % lower readings. The sensor then needs to be placed in water to hydrate at least 24 h prior to starting field measurements again.

Fig. 4.1 Keeping sensor in small beakers before and during calibration process. Only the membrane will need to be submerged in distilled water.
After recovery the sensor has to be cleaned to remove any biofouling. The following protocol is recommended by the manufacturer:
If the sensor has been for too long exposed to the air, leave it overnight in a vinegar solution.
Next day, place the sensor in soapy water and use a soft brush to gently remove any material adhered to the surface.
Rinse very well with clean water and dry carefully.
NOTE: Don’t change the foil unless it is physically damaged.
4.2. Sensor configuration for deployment
Salinity configuration: 0 PSU.
For optode sensors: when there is a small variation in salinity (less than 1 g/kg), it can be set to the mid-value avoiding the need of salinity compensation.
However, even in that case, it is a good practice to set salinity to 0 for two reasons: 1) it is usually difficult to find the salinity value defined for old deployments and 2) in case the equations change, it would be easier to recalculate oxygen values from uncompensated values.
Optodes should be configured to record the intermediate parameters (calphase and temperature), not just oxygen concentration or saturation.
Accurate time-stamps, or offsets relative to CT measurements must be recorded for performing the lag correction.
4.3. Antifouling
Materials immersed in water experience a series of biological and chemical processes, resulting in the formation of complex layers with attached organisms. This biofouling can be divided into microfouling and macrofouling (Delgado et al., 2021).
In optodes sensors, biofouling can be severe enough to block oxygen molecules from entering the sensing foil. Aanderaa has different solutions that have been successfully applied, some includes:
Copper tape (e.g. 3M 1181) or Copper/Nickel (last much longer) are easy antifouling solutions. When applying the tape, be sure that it is not in contact with any other metal parts otherwise, the tape will lose its antifouling properties.
Paints / coatings - optical sensors, so these can only reduce growth nearby but not on the actual sensing foil.
Ongoing trials: Aanderaa is focusing on non-toxic methods like fibre/haircloth and “shark skin” film.
Mechanical wipers or UV radiation based approaches are generally unsuitable for gliders due to their increased power requirements and drag. Where optodes are mounted in such a way as to allow in-air sampling biofouling is likely reduced.
Regardless of whether efforts to prevent fouling are made, it is vital that post-recovery photographs are taken of the optode so that the impact of biofouling can be assessed during DMQC.
4.4. Air saturation quality check
Prior to deployment in-air measurements can be used as a reference to correct for drift. Aanderaa outline a method (Data Instruments AS, 2018) based on in-air calibrations on Argo floats and gliders (Bittig and Körtzinger, 2015), (Johnson et al., 2015), (Bittig et al., 2015), (Nicholson and Feen, 2017) and (Bittig et al., 2018). It is recommended to take in-air measurements both before and after deployments. This won’t be useful if sensor foil is not wet or the temperature of the foil is different from that measured with the temperature sensor. It therefore is best performed with 4330 and similar sensors where the temperature probe is next to the foil. You will need to leave the sensor logging outside in the free air for several hours before and after deployment. Remember to record the local air pressure.
NOTE: At sea level at standard air pressure (101.3 kPa = 1 Atm = 14.69 psi) the sensors should show 100 % if wet and 102 % if completely dry; at air pressure 100 kPa it should show (1.3/101.3)100 = 1.3 % lower. See also Section 4.6.
NOTE: It is highly recommended to do this protocol at night when humidity is higher and the temperature is lower and more stable.
4.5. Pre-deployment calibration
Optodes and similar instruments generally drift more while in storage than while in use. It is therefore essential that these instruments are recalibrated prior to glider deployment. This is necessary even if in-situ reference (Winkler) samples are taken during the deployment as they will not cover the full range of oxygen concentrations during the period of the mission. As the instrument drift manifests as an increasing offset from zero in addition to a reducing sensitivity, a two point calibration is required to rescale the optodes measuring range.
4.5.1. Two point calibration procedure
Two point calibration is used primarily to rescale the sensor to account for a reduction in sensitivity of the sensing foil over time.
It’s recommended to do it before the deployment and after recovery. NOTE: Sensor foil must be wet during all procedure steps.
This procedure is suitable for the measurement of the full range of oceanic oxygen concentrations (0-400 μmol kg-1) in uncontaminated seawater.*
Some information to read before we proceed with the calibration:
For a 100 % bubbled bath, connect an aquarium pump to a tube which has been fitted with a porous stone (bubble dispenser) at the end. This will create small air bubbles that are sufficient to equilibrate the water rapidly. To verify that optodes are in saturated water you can take them up from the water and hold them just above the surface for a few minutes. There should then be no change in the saturation readings (Aanderaa Best Practices). Avoid submerging the air-stones as this can supersaturate the solution. Use a magnetic stirrer to homogenize the water. It is important that the aquarium pump takes in air from an open atmosphere outside, not from inside the room/laboratory where O2 levels will be affected by the ongoing activities and/or the ventilation.
For 0 % saturation solution, add 20 g sodium sulphite to approx. 1 L. A high level of precision is not required, and excess sodium sulphite is not an issue. Sodium sulphite rapidly removes the oxygen and, as long as crystals of the compound can be seen, the oxygen level in the water will stay at 0. Sodium sulphite also has the advantage of being inexpensive and the level of toxicity is low. This solution is considered irritating and wearing appropriate PPE (gloves, goggles and lab coat) is recommended. There is also an option of removing the oxygen from the water bubbling nitrogen all time. In this case you have to be sure all oxygen is removed from the solution, this will happen after 3-5 minutes bubbling (maximum volume of 100 mL approx., for bigger volume you will have to increase the time). You have to keep injecting N2 during all time of the zero calibration.
If any residue of the sodium sulphite solution remains on the sensing surface, the 100 % measurement will be inaccurate. Therefore, 100 % DO saturation calibration should be performed first. To avoid contamination, always rinse well with distilled water.
Always check saturation values: an outset of ± 5 % is adequate, so a value between 95 % and 105 % is correct. See {numref}(air_pressure_effects).
While calibrating, changing air pressure and water temperature will affect the partial pressure (and apparent saturation concentration) which makes calibration difficult. Accurate air pressure readings for the room and a stable room temperature is ideal. When onboard a ship or in a lab external meteorological sensors will not represent those conditions inside and should only be used if the calibration is to be done outside. A portable barometer and air thermometer is highly recommended.
The Winkler method can be used to determine the concentration of 100 % solution (± 0.15 μmol kg-1). We recommend following the GO-SHIP protocol described by (Langdon, 2010) and a well-trained technician to do the sampling and analysis. It can not be used for the 0 % solution and shouldn’t be used for concentration below 20 μmol kg-1 (Thomsen et al., 2016).
It is recommended to perform the calibration at least two different temperatures which cover the expected in-situ temperature range. There are several possibilities in order to achieve this, some examples:
Doing the experiments in rooms with different temperatures. Such as a walk-in fridge and a normal lab. You need to leave all materials, reagents and sensors in the room at least 8 hours (e.g. overnight) before starting the calibration.
Doing the experiment in a room where the temperature can be adjusted, such as with a power air-conditioning unit. You need to leave all materials, reagents and sensors in the room at least 8 hours at each temperature before starting the calibration.
Doing the experiment using a thermostatic bath. You need to leave the 0 and 100% solutions in the bath at least overnight before starting the calibration. It is most likely that you won’t be able to use a magnetic stirrer, so you need to be sure that you place the end of the bubble tube in the bottom of the bottle/beaker.
The preferred method is with a thermostatic bath.
In situ intercomparison will be required to find the offset of the sensor in different seawater conditions. Therefore, samples should be taken in the tank during the ballasting (if this is 1-2 days before deployment, no more) and at the deployment/recovery site (ideally at different depths).
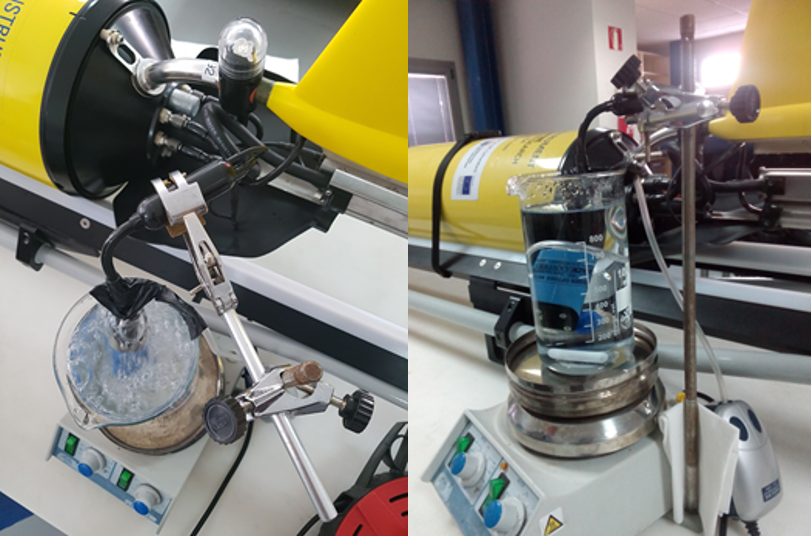
Fig. 4.2 Setup for 100% and 0% calibration.
4.5.1.1. Calibration procedure
The commands and steps needed to calibrate an oxygen sensor vary, see Section 12.1 for specific details. Here we outline the general procedure for a two point calibration.
Prepare a 100 % saturation water solution.
Immerse the sensor in the 100 % solution overnight. If this is not possible, having the sensor submerged in distilled water will be enough to keep the foil wet for the calibration.
Immerse the sensor(s) and ensure the sensing foils have been kept moist.
Prepare the 0 % solution in another container.
Connect to and power on your sensor, it is good practice to log the output from the terminal session to a file for reference.
Observe the local air-pressure and update the instrument if needed.
Begin taking measurements with the sensor, once temperature and oxygen concentration readings have stabilized these values are used as the saturation concentration data point.
Move the sensor to the 0 % solution and wait for the readings to stabilize, use these readings as the zero value.
Self calibrating sensors, such as optodes, can now be told to calibrate themselves, otherwise use these two data points to determine the slope and intercept needed for the sensor.
Rinse the sensor thoroughly to remove any sodium sulphite solution, and return the sensor back to the 100 % saturated solution to verify the calibration. The optode should read close to 100 % saturation.
Take paired winkler samples from the 100 % solution to confirm it is 100 % saturated.
Return the sensor to the configuration required for your glider.
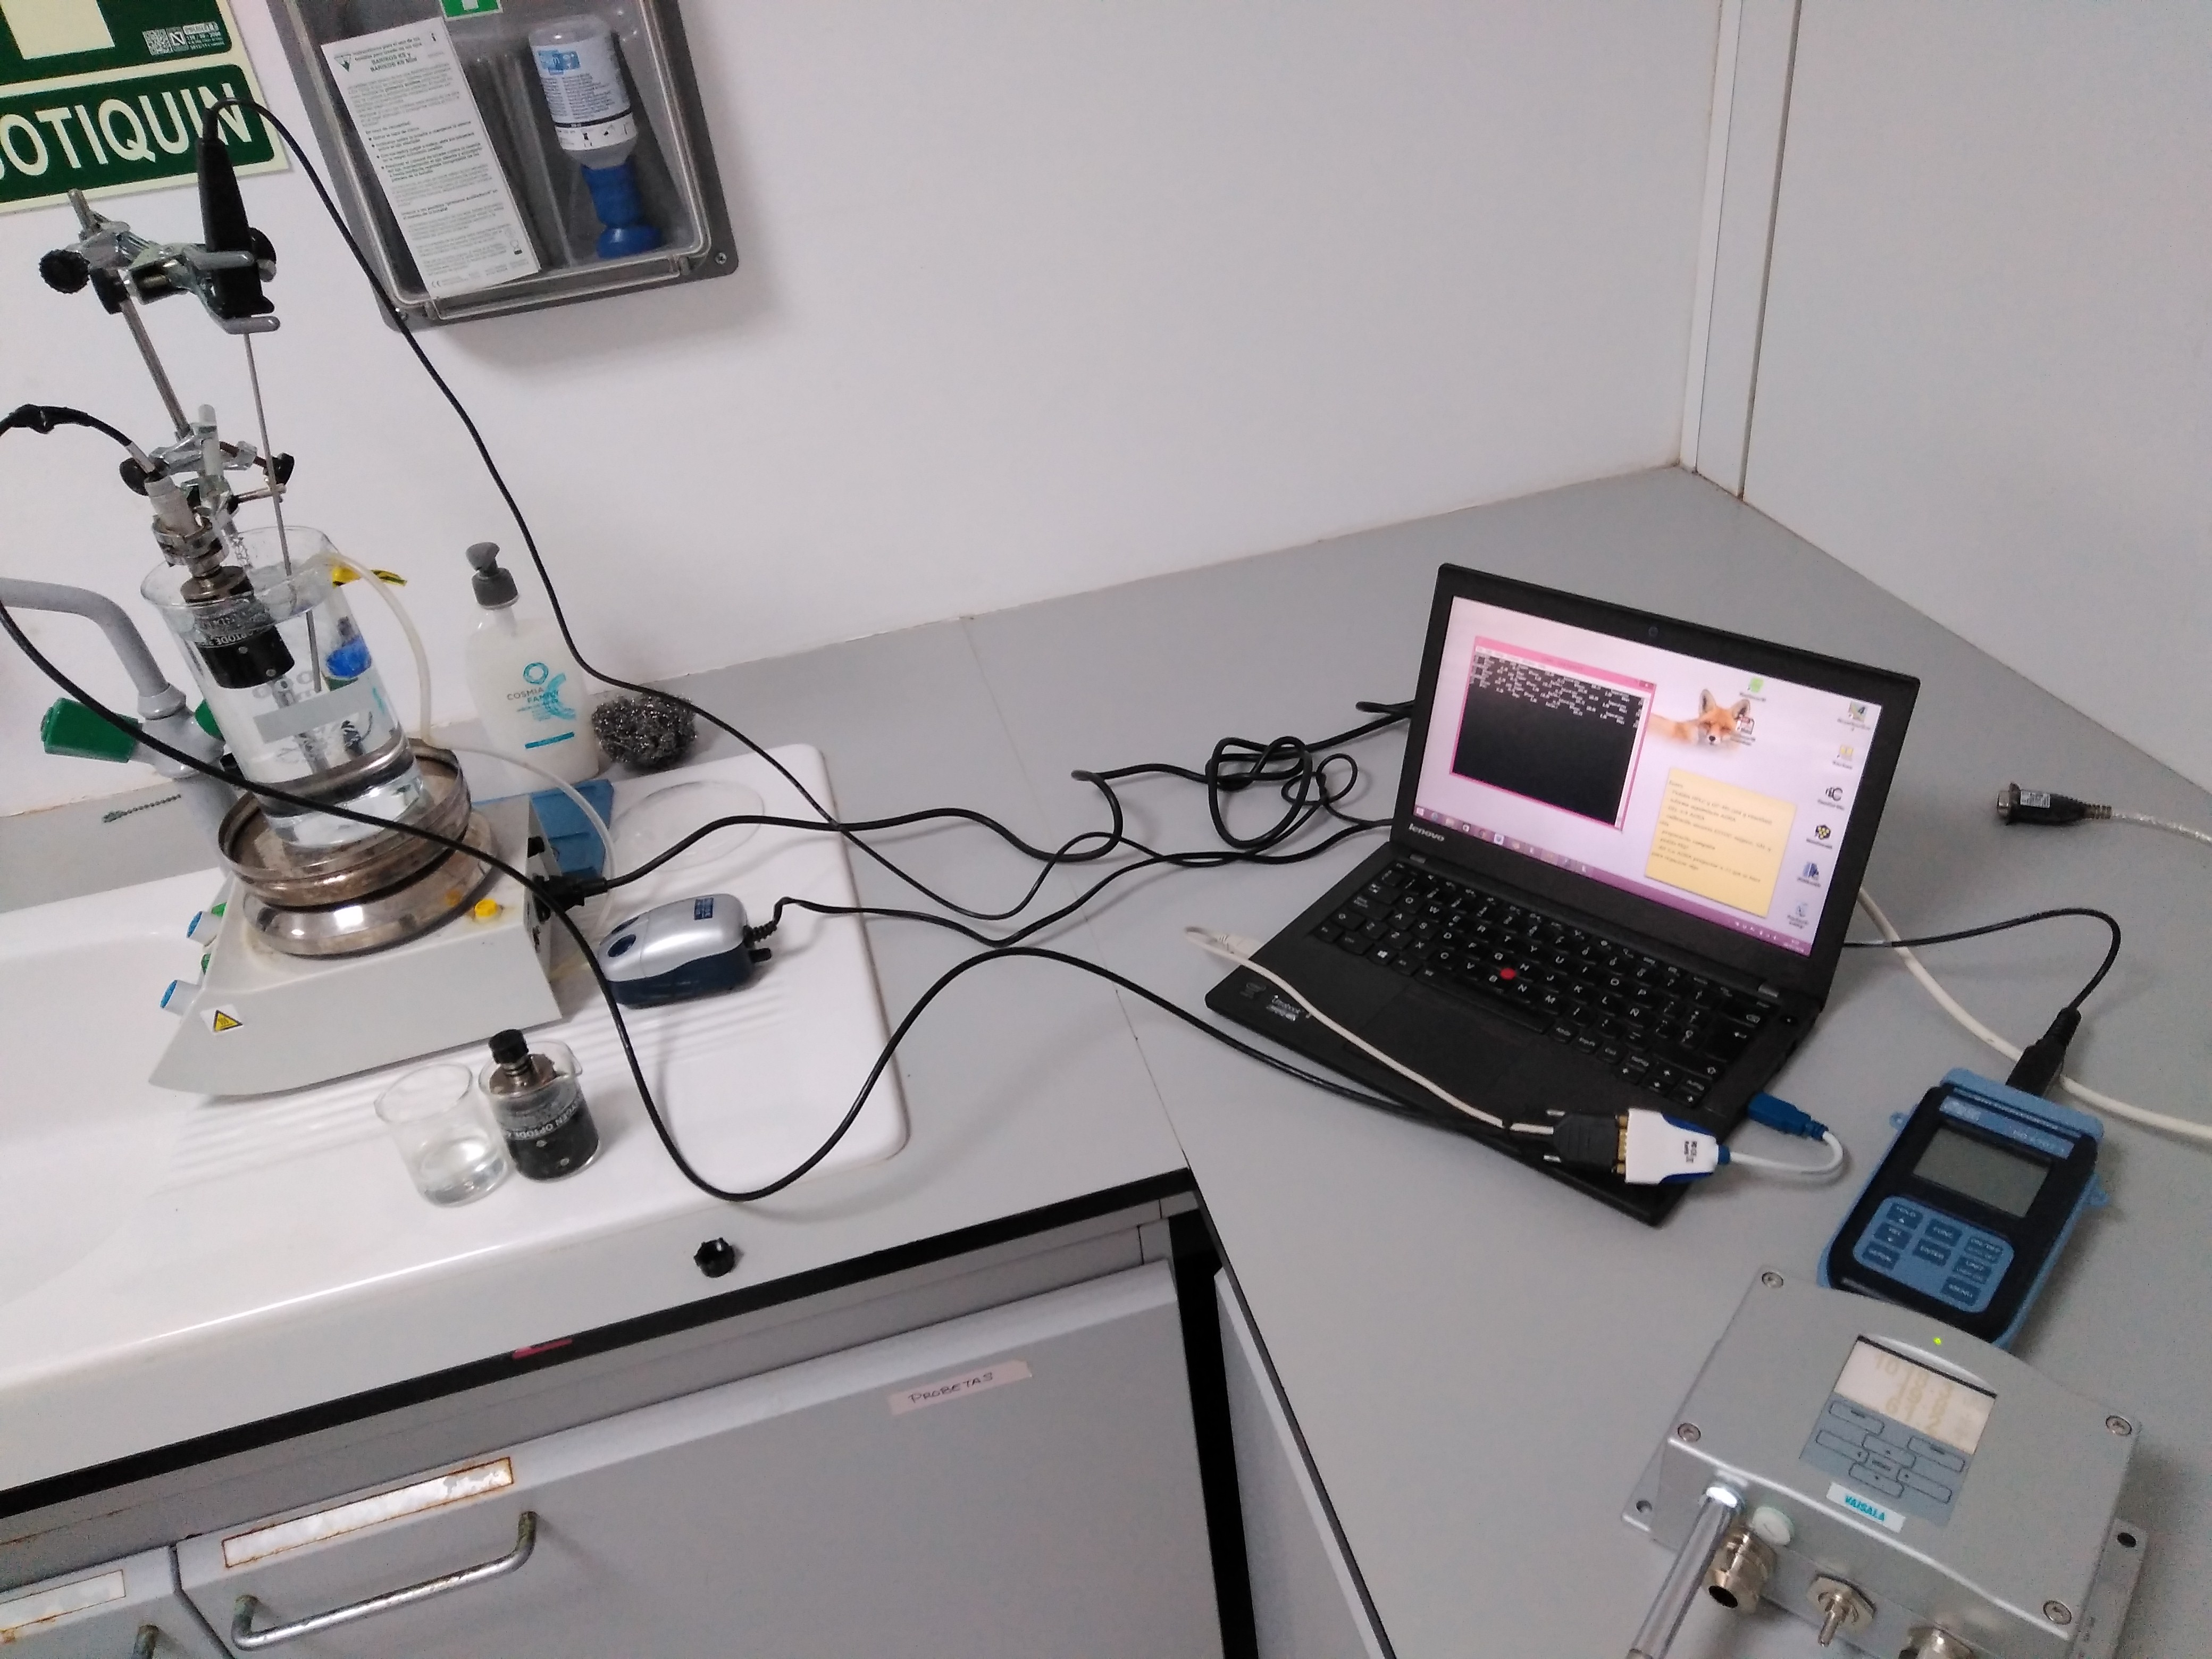
Fig. 4.3 Recording data using a terminal program.
4.5.2. In situ intercomparison in the tank during ballasting
This is an extra in situ intercomparison to carry out if access to the tank while ballasting the glider is possible and the ballasting is close in time to the deployment (no more than 1-2 days before).
Materials: Silicon tube for sampling, Winkler bottles, Winkler reagents, pipettes and tips (or a bottle-top dispenser for reagent bottles), titration material (buretes or titrator).
The sensor should be submerged overnight in water to ensure the foil is wet. If the sensor is already mounted in the glider, use a wet sponge or rubber lens cap. Keep the sensor in the dark.
Once the glider is in the ballasting tanks, place the silicon tube for sampling near the sensor.
Once the sensor measurements are stable (variations in the measurements are not higher than the precision/resolution of the sensor), start sampling water for Winkler analysis. Take paired samples every 5-10 minutes and record the time taken. 4 to 6 samples should be taken in total.
Check the outset of the sensor by comparing values measured by the Optode sensor with winkler values after measuring the bottle samples in the lab.
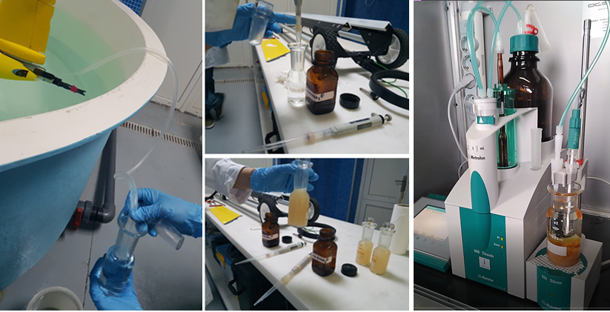
Fig. 4.4 Taking samples for Winkler analysis during ballasting in the glider tank at PLOCAN facilities.
4.6. Effects of atmospheric pressure during calibration
During the above procedures it is important to note that the equilibrium saturation oxygen concentration (Csat i.e. Garcia and Gordon (1992)) is expressed relative to 1 atmosphere. This solubility parametrization is described as having an RMS error of 0.3 % (± 1.01 μmol kg-1). The pressure effects can be significant, at 10 oC a change in local air pressure between 990 and 1010 hPa changes the equilibrium concentration by 5.4 μmol kg-1. The quality of the local air pressure measurements during calibration is worth considering. Ponte and Dorandeu (2003) estimated the overall uncertainty for ECMWF products to be typically less than 3 hPa over most of the ocean. This is equivalent to a 0.9-1.1 μmol kg-1 error in Csat.
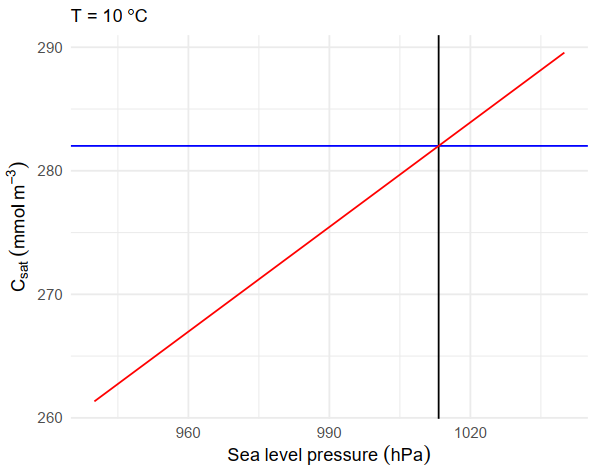
Fig. 4.5 Effect of local air pressure on the equilibrium saturation oxygen concentration (Csat) at 10 oC.